
Introduction
SharePoint 2016 to SharePoint Online migration is the process of moving sites, libraries, files, folders, permissions, and metadata from on-premises SharePoint Server 2016 to Microsoft’s cloud-based SharePoint Online.
Organizations still running SharePoint 2016 need this migration because Microsoft ended extended support for the platform on July 14th, 2026, which means no more security patches, bug fixes, or technical support going forward.
IT teams handling the migration typically use a dedicated migration tool to streamline the process. If your organization is still on SharePoint 2016, this guide walks through the steps to migrate to SharePoint Online.
Why SharePoint 2016 to SharePoint Online Migration Matters Right Now
Microsoft officially ended extended support for SharePoint Server 2016 on July 14, 2026. If your organization is still running it, you are on a platform that no longer receives security updates, cumulative updates, or technical support from Microsoft.
That doesn’t mean SharePoint 2016 stops working overnight. Your team can still log in, open files, and continue their day-to-day work. What stops is Microsoft’s safety net. If a new vulnerability shows up in the platform or if something breaks at a technical level, there is no patch coming and no support ticket that gets you help.
Unlike some other Microsoft products, there is also no paid extended security update program to buy extra time on SharePoint 2016. And that is exactly the kind of environment threat actors look for. Unpatched, internet-facing SharePoint forms get scanned and targeted quickly once a new exploit becomes public.
We recommend going through Microsoft’s official lifecycle documentation to confirm exactly where your SharePoint 2016 environment’s build and patch level stand today. From there, the practical path forward for most organizations is to consolidate their on-premises data into SharePoint Online.
Planning and Preparing for the Migration
When it comes to migrating from SharePoint 2016 to SharePoint Online, securely and successfully, proper planning and preparation is a must. We recommend following these essential planning and preparation steps.
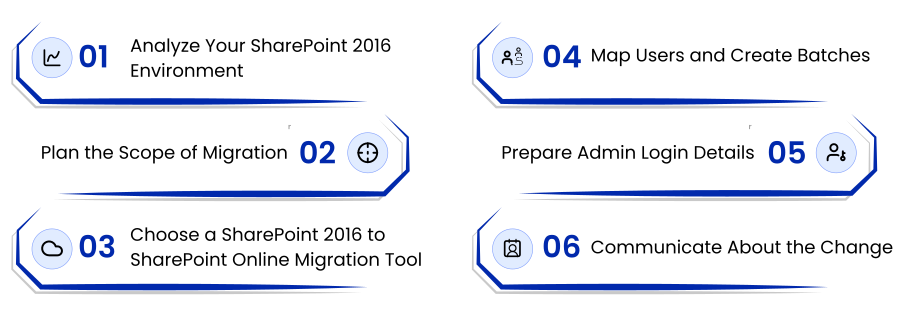
1) Analyze Your SharePoint 2016 Environment
One of the most important planning steps is to perform a pre-migration analysis on your SharePoint 2016 environment and get a clear picture of the usage patterns. Based on analysis you should be able to get a clear picture of:
- Total number of site collections and sub-sites
- Total volume of files, folders, and their sizes
- Total number of user accounts and their permission levels
- Metadata that must be preserved, including timestamps, versions, permissions, and more
2) Plan the Scope of Migration
Based on the findings from the pre-migration assessment, prepare the scope of the migration project. Include all the action items to ensure you do not miss out on any area after the migration is initiated.
3) Choose a SharePoint 2016 to SharePoint Online Migration Tool
The migration tool you choose plays an integral role in determining the success. Look for a tool like CloudFuze Migrate that can:
- Connect directly to your SharePoint 2016 environment without requiring you to first stage data elsewhere.
- Preserve permission at every level, from root folders down to individual files.
- Migrate rich metadata and context, such as version history, embedded links, external sharing, shared links, inline comments, and more.
- Scale to large data volumes without downtime.
4) Map Users and Create Batches
Map your on-premises SharePoint 2016 user accounts to their corresponding SharePoint Online identities using CSV mapping. This gives your team full control and flexibility, especially when usernames or domains change as part of the move to Microsoft 365.
5) Prepare Admin Login Details
Since migrating with tools like CloudFuze Migrate requires admin-level access, it is important to be ready with SharePoint 2016 admin and Microsoft 365 Global Admin login details for the cloud authentication process.
6) Communicate About the Change
Communicating about the platform transition helps end-users better prepare for the change and keep stakeholders informed. Creating a proper communication plan early on pays off.
Steps to Migrate from SharePoint 2016 to SharePoint Online
Here are all the steps to migrate libraries, sites, users, and data from SharePoint 2016 to SharePoint Online.
Please note that we have shown the steps and screenshots only for demo purposes, and the actual migration can involve substantial data size and user count.
Step 1: Log into the CloudFuze Migration Platform
The first step is to access the CloudFuze migration platform. Create a new account here. To understand the overall platform architecture, you can go to our simple web app user guide.

Step 2: Add the SharePoint 2016 Platform
Next, in the Business Clouds section, locate the SharePoint 2016 app and click on it to add it to the CloudFuze migration platform.

Step 3: Authenticate SharePoint 2016 in CloudFuze Migrate
And all the necessary details, search SharePoint username, password, domain, URL, and display name, required for authenticating the SharePoint 2016 platform in CloudFuze Migrate.

Step 4: Add the SharePoint Online Cloud to CloudFuze
Similarly, locate the SharePoint Online cloud and select it to add it to the CloudFuze migration platform.

Step 5: Verify the Added Clouds
Visit the Manage Clouds tab and look for both clouds to ensure you have added them properly.

Step 6: Configure the Source and Destination Clouds
Visit the Team Migration section and select SharePoint 2016 as the source and SharePoint Online as the destination cloud.

Step 7: Upload CSV User Mapping
Click on the CSV icon on the tool to upload CSV user mapping paths. It is important to create mappings in a CSV file prior to uploading them.

Step 8: CSV User Mapping Example
Here is an example of mapping SharePoint 2016 and SharePoint Online users in the CSV format.

Step 9: Validate the CSV User Mapping
Upload the user mapping CSV file to the tool, and the tool will process it and generate a validation report. Download the report to check the PASS status.

Step 10: Map Users
Next, the CloudFuze Migrate tool will populate user mapping paths from the CSV mapping file. Then select the user paths you want to migrate.

Step 11: Map Permissions
The tool will generate user permission mappings. If the mapping paths are fine, then you can proceed with it or if you need modifications, click on the edit icon and make necessary adjustments.

Step 12: Select Migration Options
Next, select migration options such as permission migration, external shares migration, embedded links migration, etc.
Also select the appropriate job type and name. The first set of migrations will always be one-time migration followed by delta migration (to migrate incremental changes).

Step 13: Preview and Start the Migration
Preview all the migration configurations and if everything looks okay, click on the Start Migration button to start the data transfer process.

Step 14: Check the Migration Reports
You will be automatically redirected to the Reports page. There, check the live status of the migration. As the migration process starts, the reports dashboard will show the “In-progress” status.

Once the migration process is completed, it will show as “Processed,” and “Completed.”

Post-Migration Steps
1) Run Delta Migration
Since your source SharePoint 2016 environment likely stays active while the one-time migration runs, incremental changes will build up. Schedule delta migration jobs to capture these changes, ideally during periods of lower user activity like weekends.
2) Validate the Migration
Check migration reports for each batch, confirming the number of users, files, and folders migrated, total data size, any warnings or conflicts, and migration start and completion times.
3) Post-Migration Integration
Identify any tools or apps that were integrated with your SharePoint 2016 environment and reconnect them to SharePoint Online so shared data continues to sync properly.
4) Decommission the SharePoint 2016 Environment
Once validation is complete and users are confirmed to be working entirely out of SharePoint Online, plan the decommissioning of your on-premises SharePoint 2016 servers.
This should follow Microsoft’s official decommissioning guidance to make sure nothing is missed on the infrastructure side.
5) User Onboarding and Go Live
Onboard your users to SharePoint Online. Since the interface and core functionality are broadly familiar to anyone who’s used SharePoint before, training needs are typically lighter than migrations involving a completely different platform.
Potential Challenges and How to Solve Them
Migrating from an on-premises SharePoint 2016 farm to SharePoint Online is a different exercise than a SharePoint Online to SharePoint Online tenant migration. The data isn’t already living in a cloud-native format, and there are a few areas where things commonly go wrong.
- On-premises permissions, especially custom permission levels, need careful mapping to ensure migration accuracy.
- SharePoint 2016 environments often carry years of custom workflows and third-party web paths that do not have a direct equivalent in SharePoint Online.
- SharePoint 2016 environments that have been running for years often have a long list of file versions.
- Migrating large datasets from on-premises SharePoint 2016 environments to SharePoint Online can cause downtime if the tool isn’t built for it.
The solution across all of these is the same: use a migration tool like CloudFuze Migrate built specifically to handle SharePoint 2016 on-premises to cloud SharePoint Online migrations, with the ability to preserve folder structures, permissions, versions, embedded links, and other metadata, at scale without causing user disruption.
CloudFuze vs. Other SharePoint Migration Tools
The robust set of functionalities and features available in CloudFuze Migrate has helped many businesses migrate from SharePoint 2016 to SharePoint Online Cloud. Here is how the tool’s capabilities compare against other SharePoint management tools.
| Capabilities | CloudFuze | Other Migration Tools |
|---|---|---|
| One-time migration | Yes | Yes |
| Delta migration | Yes | Limited |
| Root folder permissions | Yes | Yes |
| Sub folder permissions | Yes | Limited |
| Root file permissions | Yes | Yes |
| Inner file permissions | Yes | Limited |
| Embedded links migration | Yes | No |
| External shares migration | Yes | No |
| Version history migration | Yes | Limited |
| In-line file comments | Yes | No |
| Shared links migration | Yes | Limited |
| Long file and folder path handling | Yes | Limited or manual |
| Special character replacement | Yes | Limited or manual |
Migrate SharePoint 2016 SharePoint Online Successfully with CloudFuze
SharePoint 2016 has reached the end of its supported life, and the practical path forward for most organizations is consolidating that on-premises data into SharePoint Online. The technical complexity of the migration, from metadata preservation to legacy customizations, is exactly why a proper plan and the right tool matter here.
At CloudFuze, we’ve built our SharePoint 2016 to SharePoint Online migration path specifically to handle this kind of on-premises to cloud transition. We preserve permissions, structure, and metadata at every level, so your team doesn’t lose anything in the move.
Connect with our team to discuss your SharePoint 2016 migration or request a free quote tailored to your environment.
Frequently Asked Questions
1. What are the initial steps for SharePoint 2016 to SharePoint Online migration?
Start with a full assessment of your current SharePoint 2016 environment, including sites, data volume, user accounts, and any custom workflows or add-ons. From there, check your data against SharePoint Online’s technical limits, choose a migration tool, and build out your user mapping before starting the actual migration.
2. What are the best tools for migrating SharePoint 2016 to SharePoint Online?
Look for a tool built specifically for on-premises to cloud SharePoint migrations, one that preserves permissions at every folder and file level, migrates embedded links without breakages, handles version history, and automatically remediates path length and special character issues. CloudFuze Migrate is one migration tool that supports this end-to-end.
3. How do I assess readiness for a SharePoint 2016 to SharePoint Online migration?
Compare your existing SharePoint 2016 data against SharePoint Online’s file path, file size, and character limits, and audit your permissions and custom workflows for anything that won’t map directly to the cloud. This tells you where remediation is needed before migration starts.
4. What does a SharePoint 2016 to SharePoint Online migration typically cost?
Cost depends on data volume, number of users, and the complexity of your permission structures and customizations. Reach out to our team for a quote tailored to your specific environment.
5. Can I get expert help for a SharePoint 2016 cloud migration project?
Yes. Our team at CloudFuze handles the full migration process from pre-migration assessment through validation, so your team doesn’t have to manage the technical heavy lifting internally.
About the Author: Pankaj Rai



