
Introduction
Migrating from SharePoint Online to Google Shared Drives with complete success requires careful planning. Your team must understand the end-goals and factor in the use case to create a well-informed migration plan. Equally important is to use the right cloud migration solution that helps your team migrate entire data without any downtime or user impact.
We have created this migration guide to help you plan, perform, and validate the migration while ensuring all the goals are met. Read this guide for expert tips, industry-standard best practices, step-by-step migration process, and more.
Why do Businesses Migrate from SharePoint Online to Google Shared Drives?
Businesses move from SharePoint to Shared Drives due to various reasons and use cases, such as:
- Consolidation in Google Workspace
- Cost savings
- Security reinforcements
- Data governance
- Mergers and acquisitions
Benefits of Migrating from SharePoint Online to Google Shared Drives
The benefits that businesses can gain from the migration largely depends on their specific use case. For example, if your company is planning to migrate users and data from SharePoint Online to Google Shared Drives for consolidation, the most impactful benefits can be having all data migrated to Google Workspace.
Some of the general and common benefits include:
- Cloud license structure consolidation
- Improved cloud governance
- Simplified cloud administration and management
Potential Challenges and Solutions
As it is with any cloud migration, you will likely face several challenges on the journey of moving from SharePoint to Google Shared Drives. Some of these challenges include:
- Migrating TBs and PBs of data with consistent throughput
- Migrating sharing permissions with accurate user role preservation
- Preserving timestamps
- Retaining version history
- Migrating shared links
The best way to tackle these challenges is to use an advanced cloud migration tool that supports large-scale, enterprise-level migrations from SharePoint to Shared Drives. Make sure to demo the migration tools you shortlist to understand their real-world capabilities.
Planning SharePoint Online to Google Shared Drives Migration
The best and proven way to ensure complete migration success is prior planning. The more structured the plan, the higher the chances of 100% success. Here are some of the most important migration planning steps to take:
1) Pre-Migration Analysis
Start the planning process by performing an extensive pre-migration of your company’s SharePoint Online cloud. Understand how users collaborate in various SharePoint sites, the file sharing structure between them and external collaborators, the total data size, and more. Once you gain these insights, it’s time to move to the migration scope planning stage.
2) Preparing the Scope of Work
Next, plan the overall scope of work for the migration project. Include all the user accounts, data, and features to be migrated. Here is a list of action items to consider:
- The total number of active users to migrate
- The total size of the data to be migrated
- Permissions, metadata, and other features to migrate
- The number of delta syncs needed
- The type of migration support required
3) Preparing a Communication Plan
It’s equally important to develop a proper migration communication plan with the stakeholders as well as end users. When planning the migration project’s roadmap and timeline, work on establishing a solid communication strategy that involves:
- The channels of communication
- The frequency of communication
- The agendas for communication meetings
- Key people to be included in meetings
Preparing for the Migration
Similar to proper planning, complete preparation is a must. By being fully prepared, your team can navigate through the uncertainties and complexities during the migration journey. Here are some of the important preparations to make:
1) Choose a SharePoint Online to Google Shared Drives Migration Tool
The tool you can make or break your migration. Therefore, be careful when exploring and choosing a migration tool. Learn about the tool’s technical capabilities, the migration vendor’s clientele, partnerships, and more.
At CloudFuze, we are a leading one-stop cloud migration solutions provider. We have helped some of the world’s largest companies, such as Broadcom, WeWork, GSMA, Michigan State University, and more, perform secure and successful migrations.
We offer the most advanced tool capabilities in the industry for SharePoint Online to Google Shared Drives migration. Demo our tool to test out its capabilities for your company’s entire migration needs. We are happy to offer you a free and no-obligation demo.
2) Map the User Accounts
Create user mappings to establish the migration paths for each individual user. We recommend using the CSV mapping method to map the users with complete flexibility. CSV mapping is also the best option if you decide to create custom user mapping paths.
Performing SharePoint Online to Google Shared Drives Migration
After completing all the pre-migration steps, proceed to the migration initiation phase. Follow this step-by-step process to perform the SharePoint to Shared Drives migration:
Step 1: Log in to CloudFuze or Create an Account
Go to webapp.cloudfuze.com and create an account. If you already have an account, log in to CloudFuze using your account credentials. If you are an IT admin, you can request a demo or an enterprise trial account to test the platform.

Step 2: Add and Authorize SharePoint Account
After logging in to CloudFuze, locate the SharePoint Online logo under the list of business clouds and click on it. It opens a login popup where you need to enter the Microsoft 365 admin login credentials. Please keep in mind that SharePoint Online doesn’t have login credentials of its own.

Step 3: Add and Authorize Google Shared Drives
Now, locate the Google Shared Drives logo in the business clouds list and click on it. Enter your company’s G Suite login credentials and click on the Next button.
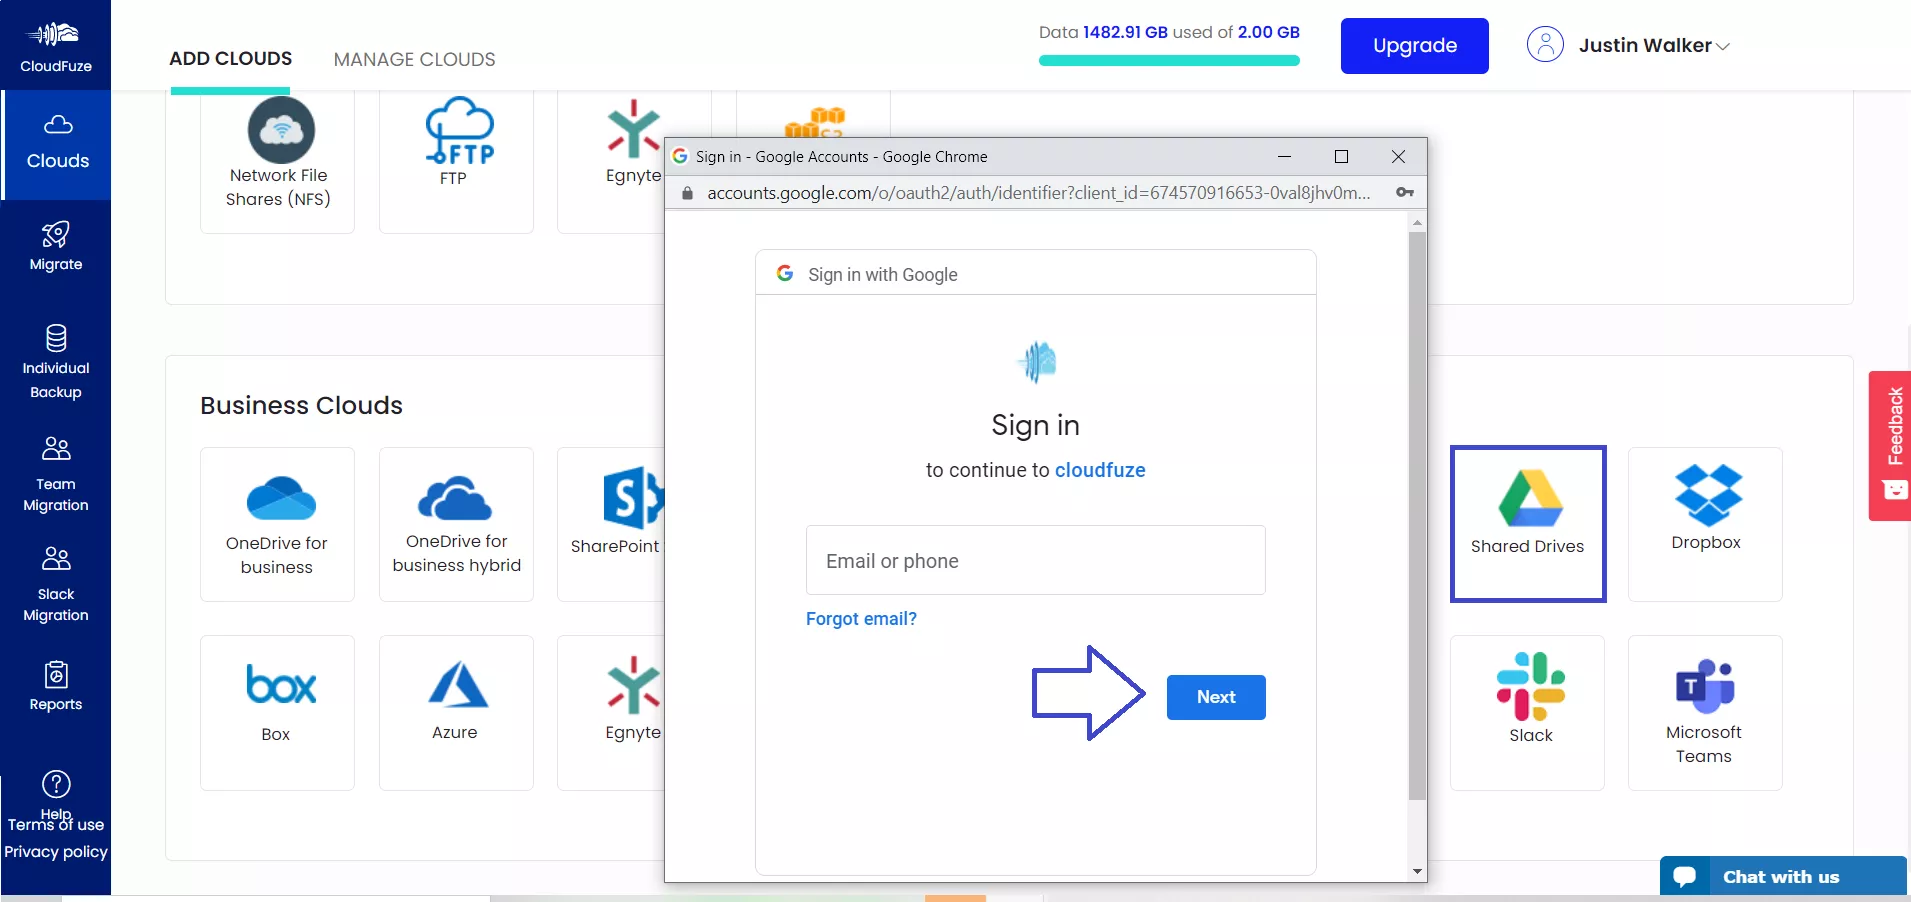
Step 4: Authorize Google Shared Drives Account
Review the needed permissions and click on the Allow button. This will complete the Shared Drives cloud addition process.

Step 5: Clouds Have Been Added
Now, go to the Clouds section by clicking on the Clouds icon in the menu. Quickly jump to the Manage Clouds section to see if both clouds are added there.

Step 6: Click on Team Migration
Click on the Team Migration. You need to complete a few steps before the actual migration begins.

Step 7: Choose Source and Destination Cloud Accounts
Select SharePoint Online account as the source and Google Shared Drives account as the destination cloud.

Step 8: Auto-Map Users in the Source and Destination
CloudFuze has a feature called Auto-Map that automatically matches user pairs in the source and destination based on their email alias. This will reduce the migration time gradually.

Step 9: Select Users to Migrate
CloudFuze supports almost unlimited numbers of users for migration. You can migrate all the users in your SharePoint Online account or choose a few, as per your needs.

Step 10: Review and Map Permissions
CloudFuze migrates all the permissions in the SharePoint Online account to Shared Drives. Additionally, you can override default permissions by clicking on the edit icon next to each user.

Step 11: A Final Few Steps
Give your migration a name. Choose the migration type. You can also give additional email addresses to receive migration notifications. Most of these settings can be left to default unless you have a specific need.

Step 12: Migration Is in Progress
During the file transfer phase, CloudFuze displays the migration as In-progress. During this time, you can pause or cancel the migration.

Step 13: Migration Has Been Completed
When all the data is migrated from SharePoint Online to Google Shared Drives, the status will be displayed as ‘Completed’. IT admins can then download the migration report to cross-verify and validate the data.

Post-Migration Tasks
After completing the one-time migration, make sure to complete a couple of post-migration tasks.
1) Delta Migration
Perform a single or multiple delta sync post-one-time migration to transfer all the incremental changes that have accumulated during the one-time migration.
2) Migration Validation
Check all the migration reports to validate the one-time and delta migration as and when they get completed. Our tool provides daily and weekly migration reports that make it simple for your team to validate the migration.
3) User Onboarding and Go Live
Provide users with proper training and onboard them once ready. After everyone’s settled in, make the Google Workspace cloud suite live across the organization.

