How to Create a Group and Add Members to It in G Suite?
Groups in G Suite allows team members to create a collective cloud workspace to upload and share documents, or even work on them parallelly. A G Suite user can create a group and invite users to be a part of it. They can also join one if they are invited. Groups feature in G Suite is similar to the groups feature in Office 365. In this tutorial, we provided simple steps on creating a group in G Suite.
Step 1: Log in to Google Groups
Sign in to Google Groups at groups.google.com.

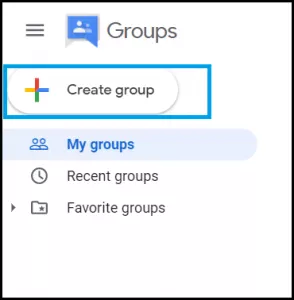
Step 2: Click on +Create a Group Button
Locate the +Create a Group button in the Google Groups portal and click on it. This will open a small form where you can enter some details to create a group.
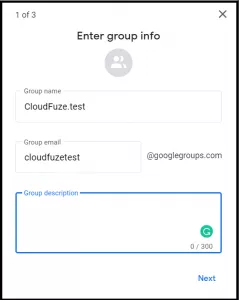
Step 3: Enter Group Details
Give your group a name. Select a common email for the group. Enter some description so invitees can recognize it.
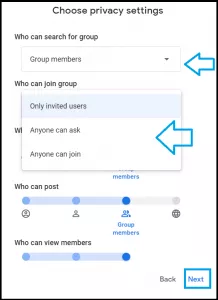
Step4: Choose Privacy Settings
You can make the group visible or invisible for search. In addition, you can also limit the group only for those whom you invite. You can also keep the privacy setting to “Anyone Can Join” to make it available for everyone.
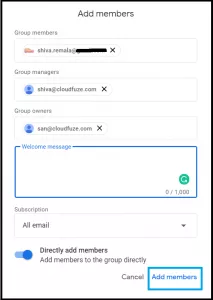
Step 5: Assign Roles
Enter the names of the users whom you want to me group members, managers, and owners. A group owner has full privileges and can even delete the group.
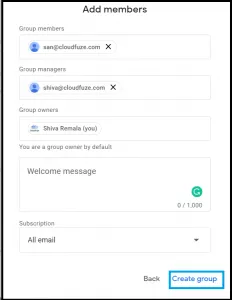
Step 6: Invite Members to the Group
Click on Add members and enter their email IDs or names to invite them. Similuatently, you can also assign roles to them.

Step 7: Send a Welcome Message
Write a welcome message and click on the Add Members link to send out invitations.
We hope you found this article on G Suite/Google Groups helpful.

